Hugo + Stack 主题美化指南 🎨

本文详细介绍了 Hugo Stack 主题的美化配置方法,包含全局样式调整、文章内容优化、侧边栏美化及其他功能增强,助你打造个性化博客。
📑 导航目录
一、🌍 全局配置
1. 🎨 页面基本配色
- ✨ 功能:自定义博客全局配色方案,包括明亮/暗黑模式下的代码块样式、圆角大小等
- 📌 位置:在
/assets/scss/custom.scss 中加入以下代码:
1
2
3
4
5
6
7
8
9
10
11
12
13
14
15
16
17
18
19
20
21
22
23
24
|
:root {
--main-top-padding: 30px;
--card-border-radius: 25px;
--tag-border-radius: 8px;
--section-separation: 40px;
--article-font-size: 1.8rem;
--code-background-color: #f8f8f8;
--code-text-color: #e96900;
&[data-scheme="dark"] {
--code-background-color: #ff6d1b17;
--code-text-color: #e96900;
}
}
|
2. 📐 全局布局调整
- ✨ 功能:调整整体页面布局结构,包括三栏宽度比例、下拉菜单样式等
- 📌 位置:在
./assets/scss/custom.scss 中加入以下代码:
1
2
3
4
5
6
7
8
9
10
11
12
13
14
15
16
17
18
19
20
21
22
23
24
25
26
27
28
29
30
31
32
33
34
35
36
37
38
39
40
41
42
43
44
45
46
47
48
49
50
51
52
53
54
55
56
57
58
59
60
61
62
63
64
65
66
67
68
69
70
71
72
73
74
75
76
77
78
79
80
81
82
83
84
85
86
87
88
89
90
91
92
93
94
95
96
97
98
99
100
101
102
103
104
105
106
107
108
109
110
111
112
113
114
115
116
117
118
119
120
121
122
123
124
125
126
127
128
129
130
131
132
133
134
135
136
137
138
139
140
141
142
143
144
145
146
147
148
149
150
151
152
153
154
155
156
157
158
159
160
161
162
163
164
165
166
167
168
169
170
171
172
|
.main-container {
min-height: 100vh;
align-items: flex-start;
padding: 0 15px;
gap: var(--section-separation);
padding-top: var(--main-top-padding);
@include respond(md) {
padding: 0 37px;
}
}
.container {
margin-left: auto;
margin-right: auto;
.left-sidebar {
order: -3;
max-width: var(--left-sidebar-max-width);
}
.right-sidebar {
order: -1;
max-width: var(--right-sidebar-max-width);
@include respond(lg) {
display: flex;
}
}
&.extended {
@include respond(md) {
max-width: 1024px;
--left-sidebar-max-width: 25%;
--right-sidebar-max-width: 22% !important;
}
@include respond(lg) {
max-width: 1280px;
--left-sidebar-max-width: 20%;
--right-sidebar-max-width: 30%;
}
@include respond(xl) {
max-width: 1453px;
--left-sidebar-max-width: 15%;
--right-sidebar-max-width: 25%;
}
}
&.compact {
@include respond(md) {
--left-sidebar-max-width: 25%;
max-width: 768px;
}
@include respond(lg) {
max-width: 1024px;
--left-sidebar-max-width: 20%;
}
@include respond(xl) {
max-width: 1280px;
}
}
}
.article-list--compact article .article-image img {
width: var(--image-size);
height: var(--image-size);
object-fit: cover;
border-radius: 17%;
}
.menu {
padding-left: 0;
list-style: none;
flex-direction: column;
overflow-x: hidden;
flex-grow: 1;
font-size: 1.6rem;
background-color: var(--card-background);
box-shadow: none;
display: none;
margin: 0;
border-radius: 10px;
padding: 30px 30px;
@include respond(xl) {
padding: 15px 0;
}
&,
.menu-bottom-section {
gap: 30px;
@include respond(xl) {
gap: 25px;
}
}
&.show {
display: flex;
}
@include respond(md) {
align-items: flex-end;
display: flex;
background-color: transparent;
padding: 0;
box-shadow: none;
margin: 0;
}
li {
position: relative;
vertical-align: middle;
padding: 0;
@include respond(md) {
width: 100%;
}
svg {
stroke-width: 1.33;
width: 20px;
height: 20px;
}
a {
height: 100%;
display: inline-flex;
align-items: center;
color: var(--body-text-color);
gap: var(--menu-icon-separation);
}
span {
flex: 1;
}
&.current {
a {
color: var(--accent-color);
font-weight: bold;
}
}
}
}
.menu::-webkit-scrollbar {
display: none;
}
.sidebar header .site-name {
margin: 8px;
font-size: 2rem;
}
|
二、📝 文章内容美化
1. ✨ 文章内容基本美化
- ✨ 功能:优化文章内代码块、图片、引用等元素的显示效果
- 📌 位置:在
./assets/scss/custom.scss 中加入以下代码:
1
2
3
4
5
6
7
8
9
10
11
12
13
14
15
16
17
18
19
20
21
22
23
24
25
26
27
28
29
30
31
32
33
34
35
36
37
38
39
40
41
42
43
44
45
46
47
48
49
50
51
52
53
54
55
56
57
58
59
60
61
62
63
64
65
66
67
68
69
70
71
72
73
74
75
76
77
78
79
80
81
82
83
84
85
86
87
88
89
90
91
92
93
94
95
96
97
98
99
100
101
102
103
104
105
106
107
108
109
110
111
112
113
114
115
116
117
118
119
120
121
122
123
|
.article-content {
blockquote {
border-left: 6px solid #358b9a1f !important;
background: #3a97431f;
}
}
.highlight {
max-width: 102% !important;
background-color: var(--pre-background-color);
padding: var(--card-padding);
position: relative;
border-radius: 20px;
margin-left: -7px !important;
margin-right: -12px;
box-shadow: var(--shadow-l1) !important;
&:hover {
.copyCodeButton {
opacity: 1;
}
}
[dir="rtl"] & {
direction: ltr;
}
pre {
margin: initial;
padding: 0;
margin: 0;
width: auto;
}
}
[data-scheme="light"] .article-content .highlight {
background-color: #fff9f3;
}
[data-scheme="light"] .chroma {
color: #ff6f00;
background-color: #fff9f3cc;
}
.article-page .main-article .article-content {
img {
max-width: 96% !important;
height: auto !important;
border-radius: 8px;
}
}
::selection {
color: #fff;
background: #001572;
}
a {
text-decoration: none;
color: var(--accent-color);
&:hover {
color: var(--accent-color-darker);
}
.link {
font-weight: 800;
padding: 0 2px;
text-decoration: none;
cursor: pointer;
color: #000000;
&:hover {
text-decoration: underline;
}
}
@media (prefers-color-scheme: dark) {
.link {
color: #FFFFFF;
}
}
}
.article-list article .article-image img {
width: 100%;
height: 150px;
object-fit: cover;
@include respond(md) {
height: 200px;
}
@include respond(xl) {
height: 305px;
}
}
a {
word-break: break-all;
}
code {
word-break: break-all;
}
|
2. 💬 MD 引用块样式
- ✨ 功能:为Markdown引用块添加特殊样式,增强视觉效果
- 📌 位置:在
./assets/scss/custom.scss 中加入以下代码:
1
2
3
4
5
6
7
|
.article-content {
blockquote {
border-left: 6px solid #004b28 !important;
background: #366e33;
}
}
|
3. 🖼️ 使图床链接的图片居中
- ✨ 功能:让外部图床的图片也能像本地图片一样居中显示
- 📌 位置:在
./assets/scss/partials/layout/article.scss Line 256 处(同级任意位置)增加以下代码:
1
2
3
4
5
6
7
|
p > img {
display: block;
margin: 0 auto;
max-width: 100%;
height: auto;
}
|
4. 📊 统计站点文章数量和字数
- ✨ 功能:在页脚显示博客总文章数和总字数统计
- 📌 位置:在
./layout/partials/footer/footer.html 的 <section class="powerby"> 里边,加入代码:
1
2
3
4
5
6
7
| {{ $articleCount := len .Site.RegularPages }}
{{ $totalWordCount := 0 }}
{{ range .Site.Pages }}
{{ $totalWordCount = add $totalWordCount .WordCount }}
{{ end }}
<p>发布了 {{ $articleCount }} 篇文章 | 共 {{$totalWordCount}} 字</p>
|
5. 🏠 首页文章样式
- ✨ 功能:美化首页文章列表的显示效果,包括图片圆角和悬停动画
- 📌 位置:在
./assets/scss/custom.scss 加入代码:
1
2
3
4
5
6
7
8
9
10
11
12
13
14
15
16
17
18
19
20
21
22
23
24
25
26
27
28
29
30
31
32
33
34
35
36
37
38
39
40
41
42
|
$image-scale: 1.2;
.article-list article .article-image img {
width: 100%;
height: 150px;
object-fit: cover;
@include respond(sm) {
height: 305px;
}
@include respond(md) {
height: 305px;
}
@include respond(xl) {
height: 325px;
}
}
.article-list article {
--card-border-radius: 24px;
}
.article-category a, .article-tags a {
border-radius: 11px;
}
.article-list article .article-image {
position: relative;
overflow: hidden;
}
.article-list article .article-image img:hover {
transform: scale($image-scale);
}
.article-list article .article-image img {
transition: transform 0.85s ease-in-out;
}
|
6. 🖼️ 文章内部图片样式
- ✨ 功能:优化文章内部相关文章区域的图片显示效果
- 📌 位置:在
./assets/scss/custom.scss 加入代码:
1
2
3
4
5
6
7
8
9
10
11
12
13
14
|
.article-list--compact article .article-image img {
border-radius: 17%;
}
.article-list--compact article > a {
transition: .6s ease;
}
.article-list--compact article > a:hover {
transform: scale(1.03, 1.03);
overflow: visible;
}
|
7. 💻 MacOS 风格代码块
- ✨ 功能:为代码块添加MacOS风格顶部栏,增强视觉美感
- 📌 位置:在
./assets/scss/custom.scss 中加入以下代码:
1
2
3
4
5
6
7
8
9
10
11
12
13
14
15
16
17
18
19
20
21
22
23
24
|
.article-content {
.highlight:before {
content: '';
display: block;
background: url(/code-header.svg);
height: 32px;
width: 100%;
background-size: 57px;
background-repeat: no-repeat;
margin-bottom: 5px;
background-position: -1px 2px;
}
}
[data-scheme="light"] .article-content .highlight {
background-color: #fdf4eb;
}
[data-scheme="light"] .chroma {
color: #ff6f00;
background-color: #fcf0e4cc;
}
|
- 📌 位置:在
./static 文件夹下新建 code-header.svg写入以下代码:
1
2
3
4
5
| <svg xmlns="http://www.w3.org/2000/svg" version="1.1" x="0px" y="0px" width="470px" height="130px">
<ellipse cx="65" cy="65" rx="50" ry="52" stroke="rgb(220,60,54)" stroke-width="2" fill="rgb(237,108,96)"/>
<ellipse cx="225" cy="65" rx="50" ry="52" stroke="rgb(218,151,33)" stroke-width="2" fill="rgb(247,193,81)"/>
<ellipse cx="385" cy="65" rx="50" ry="52" stroke="rgb(27,161,37)" stroke-width="2" fill="rgb(100,200,86)"/>
</svg>
|
8. 🔧 修改代码块样式
- ✨ 功能:调整代码块的边距、圆角和复制按钮位置
- 📌 位置:修改
.\assets\scss\partials\layout\article.scss,在文件尾添加:
1
2
3
4
5
6
7
8
9
10
11
12
13
14
15
|
.highlight {
margin-left: 0;
margin-right: 0;
width: calc(100%);
border-radius: var(--card-border-radius);
}
.copyCodeButton {
top: 6px;
right: 6px;
}
|
9. 🎯 代码块高亮
- ✨ 功能:配置代码语法高亮样式,支持行号显示
- 📌 位置:在
hugo.yaml 中,添加 highlight 参数:
1
2
3
4
5
6
7
8
9
10
| markup:
highlight:
noClasses: false
codeFences: true
guessSyntax: true
lineNoStart: 1
lineNos: true
lineNumbersInTable: true
tabWidth: 4
style: github-dark
|
10. 🚫 关闭代码块语言显示
- ✨ 功能:隐藏代码块顶部的语言标识
- 📌 位置:在
./assets/scss/custom.scss 中加入以下代码:
1
2
3
4
|
.languageCodeButton {
display: none;
}
|
11. 🔗 外部链接后面显示图标
- ✨ 功能:为外部链接添加图标标识,提示用户这是外部链接
- 📌 位置:创建
./layouts/_default/_markup/render-link.html文件之后增加如下代码:
1
2
3
4
5
6
7
8
9
10
11
| <a class="link" href="{{ .Destination | safeURL }}" {{ with .Title }} title="{{ . }}" {{ end }} {{ if strings.HasPrefix .Destination "http" }} target="_blank" rel="noopener" {{ end }}>
<span style="display: inline-flex; align-items: center; gap: 0.5em;">
{{ .Text | safeHTML }}
{{ if strings.HasPrefix .Destination "http" }}
<svg width=".7em" height=".7em" viewBox="0 0 21 21" xmlns="http://www.w3.org/2000/svg">
<path d="m13 3l3.293 3.293l-7 7l1.414 1.414l7-7L21 11V3z" fill="currentColor" />
<path d="M19 19H5V5h7l-2-2H5c-1.103 0-2 .897-2 2v14c0 1.103.897 2 2 2h14c1.103 0 2-.897 2-2v-5l-2-2v7z" fill="currentColor" />
</svg>
{{ end }}
</span>
</a>
|
12. 📋 语言和复制按钮
- ✨ 功能:改进代码块的语言标识和复制按钮的显示方式
- 📌 位置:在
./assets/ts/main.ts 中,第 66 行开始,改成以下代码
1
2
3
4
5
6
7
8
9
10
11
12
13
14
15
16
17
18
19
20
21
22
23
24
25
26
27
28
29
30
31
32
33
34
35
36
37
38
39
40
| const highlights = document.querySelectorAll(".article-content div.highlight");
const copyText = `📄拷贝`,
copiedText = `已拷贝!`;
highlights.forEach((highlight) => {
const copyButton = document.createElement("button");
copyButton.innerHTML = copyText;
copyButton.classList.add("copyCodeButton");
highlight.appendChild(copyButton);
const codeBlock = highlight.querySelector("code[data-lang]");
const lang = codeBlock.getAttribute("data-lang");
if (!codeBlock) return;
copyButton.addEventListener("click", () => {
navigator.clipboard
.writeText(codeBlock.textContent)
.then(() => {
copyButton.textContent = copiedText;
setTimeout(() => {
copyButton.textContent = copyText;
}, 1000);
})
.catch((err) => {
alert(err);
console.log("Something went wrong", err);
});
});
const languageButton = document.createElement("button");
languageButton.innerHTML = lang.toUpperCase() + " ";
languageButton.classList.add("languageCodeButton");
highlight.appendChild(languageButton);
});
new StackColorScheme(document.getElementById("dark-mode-toggle"));
|
- 📌 位置:在
./assets/scss/custom.scss 中加入以下代码调整按钮位置:
1
2
3
4
5
6
7
8
9
10
11
12
13
14
15
16
17
18
19
20
21
22
23
24
25
26
27
28
29
30
31
32
33
34
35
|
.article-content .copyCodeButton {
position: absolute;
top: 10px;
right: 18px;
border-radius: 12px;
color: #ffffff;
background: #3d3c3c;
border: 1px solid #333;
padding: 5px 10px;
font-weight: 500;
text-shadow: 0 0 1px rgba(255, 255, 255, 0.5);
}
.article-content .copyCodeButton:hover {
background: #ffa500;
border-color: #000;
}
|
13. 📑文章目录折叠&展开
- 将以下代码复制到
layouts/partials/footer/custom.html文件中(文件不存在则自行创建)
1
2
3
4
5
6
7
8
9
10
11
12
13
14
15
16
17
18
19
20
21
22
23
24
25
26
27
28
29
30
31
32
33
34
35
36
37
38
39
40
41
42
43
44
45
46
| <style>
#TableOfContents > ul, ol {
ul, ol {
display: none;
}
.open {
display: block;
}
}
</style>
<script>
function initTocHide() {
let toc = document.querySelector(".widget--toc");
if (!toc) {
return;
}
window.addEventListener('scroll', function() {
let openUl = document.querySelectorAll(".open");
if (openUl.length > 0) {
openUl.forEach((ul) => {
ul.classList.remove("open")
})
}
let currentLi = document.querySelector(".active-class");
if (!currentLi) {
return
}
if (currentLi.children.length > 1) {
currentLi.children[1].classList.add("open")
}
let ul = currentLi.parentElement;
do {
ul.classList.add("open");
ul = ul.parentElement.parentElement
} while (ul !== undefined && (ul.localName === 'ul' || ul.localName === 'ol'))
});
}
initTocHide()
</script>
|
14. 🧑💻 代码块过长折叠&展开
- 创建
layouts/partials/footer/code-block.html ,引入以下代码
- 修改后的 code-block.html
- 在
layouts/partials/footer/custom.html 中引入 code-block.html
1
| {{ partial "footer/code-block.html" . }}
|
三、📌 侧边栏美化
1. 📏 页面左右边栏宽度
- ✨ 功能:调整左右侧边栏的宽度比例,优化阅读体验
- 📌 位置:在
/themes/hugo-theme-stack/assets/scss/grid.scss 的第 29、30 行,修改为:
1
2
| --left-sidebar-max-width: 14%;
--right-sidebar-max-width: 22%;
|
2. 🎭 右侧导航栏动画
- ✨ 功能:为右侧边栏元素添加悬停动画效果
- 📌 位置:在
./assets/scss/custom.scss 中加入以下代码:
1
2
3
4
5
6
7
8
9
10
11
12
13
14
15
16
17
18
19
20
21
|
.widget.archives .widget-archive--list {
transition: transform .3s ease;
}
.widget.archives .widget-archive--list:hover {
transform: scale(1.05, 1.05);
}
.tagCloud .tagCloud-tags a {
border-radius: 10px;
font-size: 1.4rem;
transition: transform .3s ease;
}
.tagCloud .tagCloud-tags a:hover {
transform: scale(1.1, 1.1);
}
|
3. 🎨 左侧导航栏美化
- ✨ 功能:美化左侧边栏的头像、社交图标等元素
- 📌 位置:在
./assets/scss/custom.scss 加入代码:
1
2
3
4
5
6
7
8
9
10
11
12
13
14
15
16
17
|
.left-sidebar {
--sidebar-avatar-size: 115px;
--sidebar-element-separation: 15px;
--emoji-size: 40px;
--emoji-font-size: 25px;
}
.social-menu svg {
gap: 15px;
justify-content: center;
width: 30px;
height: 30px;
stroke: var(--body-text-color);
stroke-width: 1.33;
}
|
4. ✨ 左侧导航栏动画
- ✨ 功能:为左侧菜单项添加悬停动画效果
- 📌 位置:在
./assets/scss/custom.scss 中加入以下代码:
1
2
3
4
5
6
7
8
9
10
11
12
13
14
15
16
17
18
19
20
21
22
23
24
25
26
27
28
29
30
31
32
33
34
35
36
37
38
39
40
41
42
43
44
45
46
47
48
49
50
51
52
53
54
55
56
57
58
59
60
61
62
63
64
65
66
67
|
#main-menu {
overflow: visible
}
#main-menu .current {
transform: scale(1.1)
}
#main-menu>li:not(.current) a {
transition: transform .2s ease-in-out
}
#main-menu>li:not(.current) a:hover {
transform: scale(1.1)
}
#dark-mode-toggle {
transition: transform .2s ease-in-out
}
#dark-mode-toggle:hover {
transform: scale(1.1)
}
#dark-mode-toggle:hover svg {
transform: rotate(180deg)
}
.menu-social {
overflow: visible
}
.menu-social li {
transition: transform .8s ease-in-out
}
.menu-social li:hover {
transform: scale(1.3)rotate(360deg)
}
.article-list--compact {
overflow: visible;
}
.article-list--compact article {
transition: transform 0.6s ease;
-webkit-font-smoothing: antialiased;
will-change: transform;
&:hover {
transform: scale(1.05,1.05);
z-index: 4;
}
}
.article-list--tile article {
transition: 0.6s ease;
}
.article-list--tile article:hover {
transform: scale(1.05, 1.05);
will-change: transform;
}
|
5. 🤝 社交 social
- ✨ 功能:自定义社交图标并添加旋转动画效果
- 📌 说明:自定义图标,iconfont 下载,颜色 #2c3e50,大小 24,格式 svg。下载后放到
.\assets\icons
- 📌 说明:本主题自带了一些来自【Tabler Icons】的 SVG 图标。您可以在主题文件夹下找到它们
.\assets\icons
- 💡 提示:将下载的 img 中的 svg 的所有 #2c3e50 改成
currentColor,否则切换为黑色模式,图标颜色不能自动切换,因为优先使用内部定义的 color
- 📌 位置:修改 hugo 主配置文件,修改下面的内容:
1
2
3
4
5
6
7
8
9
10
11
12
13
14
15
16
17
18
19
20
21
22
23
24
25
26
27
| menu:
main: []
social:
- identifier: bilibili
name: Bilibili
url: https://space.bilibili.com/35158479
weight: 100
params:
icon: brand-bilibili
newTab: true
- identifier: github
name: GitHub
url: https://github.com/meimolihan
weight: 200
params:
icon: brand-github
newTab: true
- identifier: rss
name: RSS
url: https://meimolihan.github.io/index.xml
weight: 300
params:
icon: brand-rss
newTab: true
|
- 📌 位置:图标360度旋转动画
.\assets\scss\custom.scss追加以下代码:
1
2
3
4
5
6
7
8
9
10
11
12
13
14
15
16
17
18
19
20
21
22
23
24
25
| .icon-tabler-brand-bilibili {
transition: transform 1s ease-in-out;
}
.icon-tabler-brand-bilibili:hover {
transform: rotate(360deg);
}
.icon-tabler-brand-github {
transition: transform 1s ease-in-out;
}
.icon-tabler-brand-github:hover {
transform: rotate(360deg);
.icon-tabler-rss {
transition: transform 1s ease-in-out;
}
.icon-tabler-rss:hover {
transform: rotate(360deg);
}
|
6. 🌓 明亮模式调整位置
- ✨ 功能:调整明暗模式切换按钮的位置
- 📌 位置:在
./assets/scss/custom.scss 中加入以下代码:
1
2
3
4
5
6
|
#dark-mode-toggle {
margin-bottom: 100px;
gap: 30px;
}
|
7. ⚙️ 手动修改左右侧边栏设置样式
- ✨ 功能:手动精确控制左右侧边栏的宽度比例
- 📌 位置:在
/assets/scss/grid.scss 中修改 left-sidebar 和 right-sidebar 的描述:
1
2
3
4
5
6
7
8
9
10
11
12
13
14
15
16
17
|
.left-sidebar {
order: -3;
max-width: 10%;
}
.right-sidebar {
order: -1;
max-width: 20%;
@include respond(lg) {
display: flex;
}
}
|
把正文的占比改到了 70%, 原来的只有 50% 左右
8. 🔄 头像旋转
- ✨ 功能:为博客头像添加旋转动画效果
- 📌 位置:在
./assets/scss/custom.scss 中加入以下代码:
1
2
3
4
5
6
7
8
|
.sidebar header .site-avatar .site-logo {
transition: transform 1.65s ease-in-out;
}
.sidebar header .site-avatar .site-logo:hover {
transform: rotate(360deg);
}
|
9. 📂 友情链接+分类+标签+归档【三栏显示】
- ✨ 功能:将友情链接、分类、标签和归档以三栏网格布局显示
- 📌 位置:在
./assets/scss/custom.scss 中加入以下代码:
1
2
3
4
5
6
7
8
9
10
11
12
13
14
15
16
17
18
19
20
21
|
@media (min-width: 1024px) {
.article-list--compact {
display: grid;
grid-template-columns: 1fr 1fr 1fr;
background: none;
box-shadow: none;
gap: 1rem;
article {
background: var(--card-background);
border: none;
box-shadow: var(--shadow-l2);
margin-bottom: 8px;
margin-right: 8px;
border-radius: 16px;
}
}
}
|
10. 📦 缩小归档页的分类卡片尺寸
- ✨ 功能:调整归档页面分类卡片的尺寸,使其更加紧凑
- 📌 位置:在
./assets/scss/partials/layout/list.scss中加入以下代码:(并修改)
1
2
3
4
5
6
7
8
9
10
11
12
13
14
15
16
17
18
19
20
21
22
23
24
25
|
.subsection-list {
overflow-x: auto;
.article-list--tile {
display: flex;
padding-bottom: 0px;
article {
width: 230px;
height: 120px;
margin-right: 5px;
flex-shrink: 0;
.article-title {
margin: 0;
font-size: 1.8rem;
}
.article-details {
padding: 20px;
}
}
}
}
|
11. 📋 调整 TOC 目录间距
- ✨ 功能:优化目录显示的间距和样式,提高可读性
- 📌 位置:在
./assets/scss/custom.scss 中加入以下代码:
1
2
3
4
5
6
7
8
9
10
11
12
13
14
15
16
17
18
19
20
21
22
23
24
25
26
27
28
29
30
31
32
33
34
35
36
37
38
39
40
41
42
43
44
45
46
47
48
49
50
51
52
53
54
55
56
57
58
59
60
|
.widget--toc {
background-color: var(--card-background);
border-radius: var(--card-border-radius);
box-shadow: var(--shadow-l2);
display: flex;
flex-direction: column;
color: var(--card-text-color-main);
overflow: hidden;
display:inline-block;
#TableOfContents {
max-height: 65vh;
ol,
ul {
list-style-type: none;
}
li {
margin: 10px 10px;
& > ol,
& > ul {
margin-top: 10px;
padding-left: 10px;
margin-bottom: -5px;
& > li:last-child {
margin-bottom: 0;
}
}
}
& > ul {
padding: 0 1em;
}
li {
margin: 5px 20px;
padding: 6px;
& > ol,
& > ul {
margin-top: 10px;
padding-left: 10px;
margin-bottom: -5px;
& > li:last-child {
margin-bottom: 0;
}
}
}
}
}
|
12. 🔍 鼠标悬停超链接的显示
- ✨ 功能:为超链接添加悬停高亮效果,增强交互体验
- 📌 位置:在
./assets/scss/custom.scss 中加入以下代码:
1
2
3
4
5
6
7
8
9
10
11
12
13
14
15
16
17
18
19
20
|
a {
text-decoration: none;
color: var(--accent-color);
&:hover {
color: var(--accent-color-darker);
}
&.link {
box-shadow: 0px -2px 0px rgba(var(--link-background-color), var(--link-background-opacity-hover)) inset;
transition: all 0.3s ease;
&:hover {
box-shadow: 0px -18px 0px rgba(var(--link-background-color), var(--link-background-opacity-hover)) inset;
}
}
}
|
四、🔧 其它小部件
1. 📈 添加站点统计信息与 i18n
1
2
3
4
5
6
7
8
9
10
11
12
13
14
15
16
17
18
19
20
21
22
23
24
25
26
27
28
29
30
31
32
33
34
35
36
37
38
39
40
41
42
43
44
45
46
47
48
49
50
51
52
53
54
55
56
57
58
59
60
61
| <section class="count_info">
<div>
{{ T "footer.runtime1" }}
<span id="ds" class="running-days number-highlight"></span>
{{ T "footer.runtime2" }}
<span id="hs" class="running-days number-highlight"></span>
{{ T "footer.runtime3" }}
<span id="ms" class="running-days number-highlight"></span>
{{ T "footer.runtime4" }}
</div>
<div>
{{$scratch := newScratch}}
{{ range (where .Site.Pages "Kind" "page" )}}
{{$scratch.Add "total" .WordCount}}
{{ end }}
{{ T "footer.count1" }}
<span class="number-highlight">{{ len (where .Site.RegularPages "Section" "post") }}</span>
{{ T "footer.count2" }}
<span class="number-highlight">{{ div ($scratch.Get "total") 1000.0 | lang.FormatNumber 2 }}</span>
k {{ T "footer.count3" }}
</div>
<div>
<span id="busuanzi_container_site_pv">
{{ T "footer.pv1" }}
<span id="busuanzi_value_site_pv" class="number-highlight"></span>
{{ T "footer.pv2" }}
</span>
</div>
</section>
<script>
let s1 = '2025-01-01';
s1 = new Date(s1.replace(/-/g, "/"));
let s2 = new Date();
let timeDifference = s2.getTime() - s1.getTime();
let days = Math.floor(timeDifference / (1000 * 60 * 60 * 24));
let hours = Math.floor((timeDifference % (1000 * 60 * 60 * 24)) / (1000 * 60 * 60));
let minutes = Math.floor((timeDifference % (1000 * 60 * 60)) / (1000 * 60));
const ds = document.getElementById('ds');
const hs = document.getElementById('hs');
const ms = document.getElementById('ms');
ds.innerHTML = days;
hs.innerHTML = hours;
ms.innerHTML = minutes;
ds.classList.add('number-highlight');
hs.classList.add('number-highlight');
ms.classList.add('number-highlight');
const busuanziValue = document.getElementById('busuanzi_value_site_pv');
if (busuanziValue) {
busuanziValue.classList.add('number-highlight');
}
</script>
|
- 📌 位置:在主题目录
/i18n/zh-cn.yaml 下找到对应语言的文件,在属性 footer 下添加相应字段,结果如下:
1
2
3
4
5
6
7
8
9
10
11
12
13
14
15
16
17
18
19
20
21
22
23
24
| footer:
runtime1:
other: 本站稳定运行:
runtime2:
other: 天
runtime3:
other: 小时
runtime4:
other: 分钟
count1:
other: 共发表文章数:
count2:
other: 篇 · 总计
count3:
other: 字
pv1:
other: 本站总访问量:
pv2:
other: 次
|
- 修改数值颜色
- 📌 位置:找到
./assets/scss/custom.scss 在文件里面追加 :
1
2
3
4
5
6
7
8
9
10
11
12
13
14
15
16
17
18
|
.count_info {
border: 1px solid #ddd;
border-radius: 25px;
transform: translateY(-66px);
}
[data-scheme="dark"] .count_info {
border: 1px solid #39393900;
padding: 12px;
border-radius: 20px;
background: #3f3f3f;
color: #fff;
transform: translateY(-66px);
}
.number-highlight {
color: var(--hover-text-color);
font-weight: 600;
}
|
2. 🗺️ 添加访客地图
- ✨ 功能:在右侧边栏添加访客地图,可视化显示访问来源
- 📌 位置:在根目录
./layouts/partials/sidebar/right.html 添加后完整代码如下:
1
2
3
4
5
6
7
8
9
10
11
12
13
14
15
16
| {{- $scope := default "homepage" .Scope -}}
{{- $context := .Context -}}
{{- with (index .Context.Site.Params.widgets $scope) -}}
<aside class="sidebar right-sidebar sticky">
{{ range $widget := . }}
{{ if templates.Exists (printf "partials/widget/%s.html" .type) }}
{{ partial (printf "widget/%s" .type) (dict "Context" $context "Params" .params) }}
{{ else }}
{{ warnf "Widget %s not found" .type }}
{{ end }}
{{ end }}
<div style="height: 30%;width: 30%">
<script type="text/javascript" id="clstr_globe" src="//clustrmaps.com/globe.js?d=xxxxx"></script>
</div>
</aside>
{{ end }}
|
3. 🖱️ 鼠标样式
- ✨ 功能:自定义鼠标指针样式,增强博客个性化
- 📌 说明:准备好鼠标样式图片(默认,指针,文本…),图片大小建议控制在 32px 左右,将.png图片放入
static/mouse文件夹下(文件夹自己创建)
修改对应的图片名即可
- 📌 位置:修改
./assets/scss/custom.scss(文件不存在则自己创建),将以下代码复制进去,根据主题按实际情况填写对应的css选择器
1
2
3
4
5
6
7
8
9
10
11
12
13
14
15
16
17
18
19
20
21
22
23
24
25
26
27
28
29
30
31
32
33
34
35
36
37
38
39
40
41
42
43
|
body,
html,
.article-content img {
cursor: url(../mouse/default.png),
auto !important;
}
a:hover,
button:hover,
.copyCodeButton:hover,
#dark-mode-toggle {
cursor: url(../mouse/pointer.png),
auto;
}
input:hover,
.site-description,
.article-subtitle,
.article-content span,
.article-content li,
.article-content p {
cursor: url(../mouse/text.png),
auto;
}
.main-container {
gap: 50px;
@include respond(md) {
padding: 0 30px;
gap: 40px;
}
}
.related-contents {
overflow-x: visible;
padding-bottom: 15px;
}
|
4. 🎉 首页欢迎横幅
- ✨ 功能:在首页顶部添加动态欢迎横幅,增强用户体验
- 📌 位置:在
./layouts/index.html的 <section class="article-list"> 前添加以下代码:
1
2
3
4
5
6
7
8
9
10
11
|
<div class="welcome">
<p style="font-size: 2rem; text-align: center; font-weight: bold">
<span class="shake">👋</span>
<span class="jump-text1" > Welcome</span>
<span class="jump-text2"> To </span>
<span class="jump-text3" style="color:#e99312">Xa</span><span class="jump-text4" style="color:#e99312">l</span><span class="jump-text5" style="color:#e99312">a</span><span class="jump-text6" style="color:#e99312">o</span><span class="jump-text7" style="color:#e99312">k</span><span class="jump-text8" style="color:#e99312">'s</span>
<span class="jump-text9" style="color:#e99312">Blog</span>
</p>
</div>
|
- 📌 位置:在
./assets/scss/custom.scss 中加入以下代码:
1
2
3
4
5
6
7
8
9
10
11
12
13
14
15
16
17
18
19
20
21
22
23
24
25
26
27
28
29
30
31
32
33
34
35
36
37
38
39
40
41
42
43
44
45
46
47
48
49
50
51
52
53
54
55
56
57
58
59
60
61
62
63
64
65
66
67
68
69
70
71
72
73
74
75
76
77
78
79
80
81
82
83
84
85
86
87
88
89
90
91
92
93
94
95
96
97
98
99
100
101
102
103
104
105
106
107
108
109
|
.welcome {
color: var(--card-text-color-main);
background: var(--card-background);
box-shadow: var(--shadow-l2);
border-radius: 30px;
display: inline-block;
}
.shake {
display: inline-block;
animation: shake 1s;
animation-duration: 1s;
animation-timing-function: ease;
animation-delay: 0s;
animation-iteration-count: 1;
animation-direction: normal;
animation-fill-mode: none;
animation-play-state: running;
animation-name: shake;
animation-timeline: auto;
animation-range-start: normal;
animation-range-end: normal;
animation-delay: 2s;
@keyframes shake {
0% {
transform: rotate(0);
}
25% {
transform: rotate(45deg) scale(1.2);
}
50% {
transform: rotate(0) scale(1.2);
}
75% {
transform: rotate(45deg) scale(1.2);
}
100% {
transform: rotate(0);
}
}
}
.jump-text1 {
display: inline-block;
animation: jump 0.5s 1;
}
.jump-text2 {
display: inline-block;
animation: jump 0.5s 1;
animation-delay: 0.1s;
}
.jump-text3 {
display: inline-block;
animation: jump 0.5s 1;
animation-delay: 0.2s;
}
.jump-text4 {
display: inline-block;
animation: jump 0.5s 1;
animation-delay: 0.3s;
}
.jump-text5 {
display: inline-block;
animation: jump 0.5s 1;
animation-delay: 0.4s;
}
.jump-text6 {
display: inline-block;
animation: jump 0.5s 1;
animation-delay: 0.5s;
}
.jump-text7 {
display: inline-block;
animation: jump 0.5s 1;
animation-delay: 0.6s;
}
.jump-text8 {
display: inline-block;
animation: jump 0.5s 1;
animation-delay: 0.7s;
}
.jump-text9 {
display: inline-block;
animation: jump 0.5s 1;
animation-delay: 0.9s;
}
@keyframes jump {
0% {
transform: translateY(0);
}
50% {
transform: translateY(-20px);
}
100% {
transform: translateY(0);
}
}
|
5. 🗑️ 删除"使用 Hugo 构建 主题Stack由Jimmy设计"等字样
- ✨ 功能:移除页脚默认的版权信息,替换为自定义内容
- 📌 位置:删除掉
./layout/partials/footer/footer.html 原先的代码,注意是
1
2
3
4
5
6
7
8
9
10
11
12
13
14
15
16
17
18
19
20
21
22
23
24
25
26
27
28
29
30
31
32
33
| {{- $ThemeVersion := "3.29.0" -}}
<footer class="site-footer">
<section class="copyright">
©
{{ if and (.Site.Params.footer.since) (ne .Site.Params.footer.since (int (now.Format "2006"))) }}
{{ .Site.Params.footer.since }} -
{{ end }}
{{ now.Format "2006" }} {{ default .Site.Title .Site.Copyright }}
</section>
<section class="powerby">
{{ with .Site.Params.footer.customText }}
{{ . | safeHTML }} <br/>
{{ end }}
{{- $Generator := `<a href="https://gohugo.io/" target="_blank" rel="noopener">Hugo</a>` -}}
{{- $Theme := printf `<b><a href="https://github.com/CaiJimmy/hugo-theme-stack" target="_blank" rel="noopener" data-version="%s">Stack</a></b>` $ThemeVersion -}}
{{- $DesignedBy := `<a href="https://jimmycai.com" target="_blank" rel="noopener">Jimmy</a>` -}}
{{ T "footer.builtWith" (dict "Generator" $Generator) | safeHTML }} <br />
{{ T "footer.designedBy" (dict "Theme" $Theme "DesignedBy" $DesignedBy) | safeHTML }}
{{ $articleCount := len .Site.RegularPages }}
{{ $totalWordCount := 0 }}
{{ range .Site.Pages }}
{{ $totalWordCount = add $totalWordCount .WordCount }}
{{ end }}

<p>发布了 {{ $articleCount }} 篇文章 | 共 {{$totalWordCount}} 字</p>
</section>
</footer>
|
6. ⬆️ 添加【返回顶部】按钮
- ✨ 功能:添加平滑滚动返回顶部的按钮,提升用户体验
- 📌 步骤:
- 返回顶部图片,复制以下代码保存为
backTop.svg 文件,放到 ./assets/icons/文件夹下(不存在则自行创建)
1
2
3
4
5
6
7
8
| <svg xmlns="http://www.w3.org/2000/svg" width="30" height="30" viewBox="0 0 24 24" fill="none" stroke="#707070"
stroke-width="2" stroke-linecap="round" stroke-linejoin="round"
class="icon icon-tabler icons-tabler-outline icon-tabler-square-rounded-arrow-up">
<path stroke="none" d="M0 0h24v24H0z" fill="none"/>
<path d="M16 12l-4 -4l-4 4"/>
<path d="M12 16v-8"/>
<path d="M12 3c7.2 0 9 1.8 9 9s-1.8 9 -9 9s-9 -1.8 -9 -9s1.8 -9 9 -9z"/>
</svg>
|
-
创建 layouts/partials/footer/return.html ,引入以下代码
-
修改后的 return.html
-
在 layouts/partials/footer/custom.html 中引入 return.html
1
| {{ partial "footer/return.html" . }}
|
- 解决 PJAX 刷新问题
- 📌 位置:编辑
.\layouts\partials\footer\pjax.html文件 。pjax:complete 事件下,添加以下内容:
1
2
3
|
topbar.hide();
initScrollTop();
|
五、💬 Hugo 接入评论
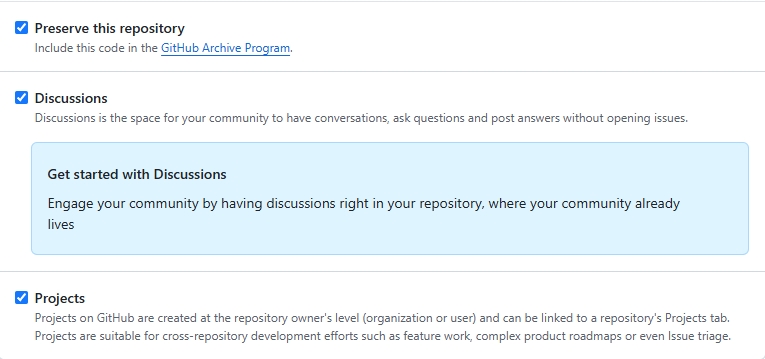
1、GitHub 打开评论
- ✨ 功能:启用GitHub Discussions作为博客评论系统
- 📌 步骤:首先进入【GitHub】,hugo 博客项目主页–>>项目设置–>>找到Discussions Loading
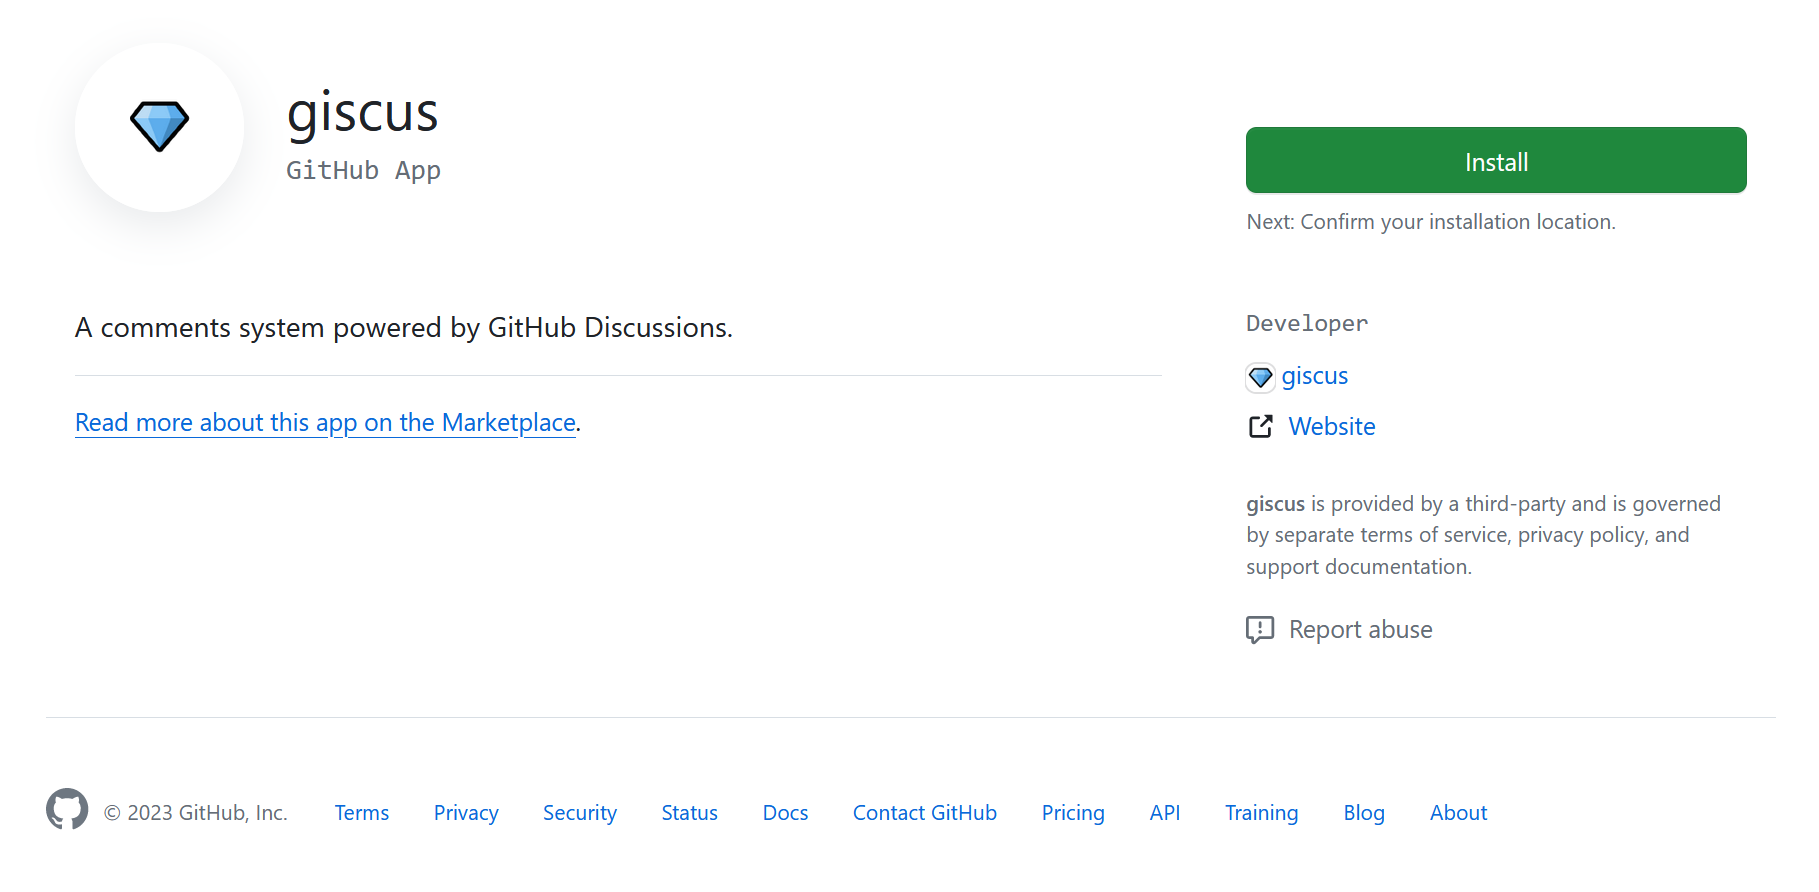
2、giscus 配置
- ✨ 功能:安装并配置giscus评论系统
- 📌 步骤:在 github 上安装 【giscus APP】
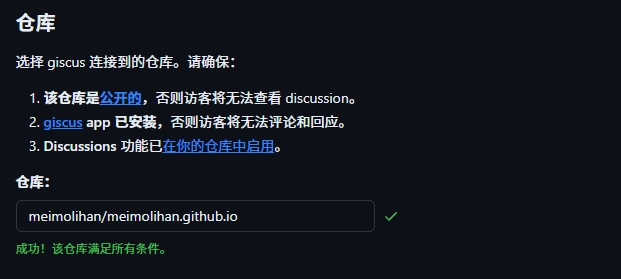
3、GitHub 博客项目接入 giscus
- ✨ 功能:将giscus与GitHub博客项目连接
- 📌 步骤:
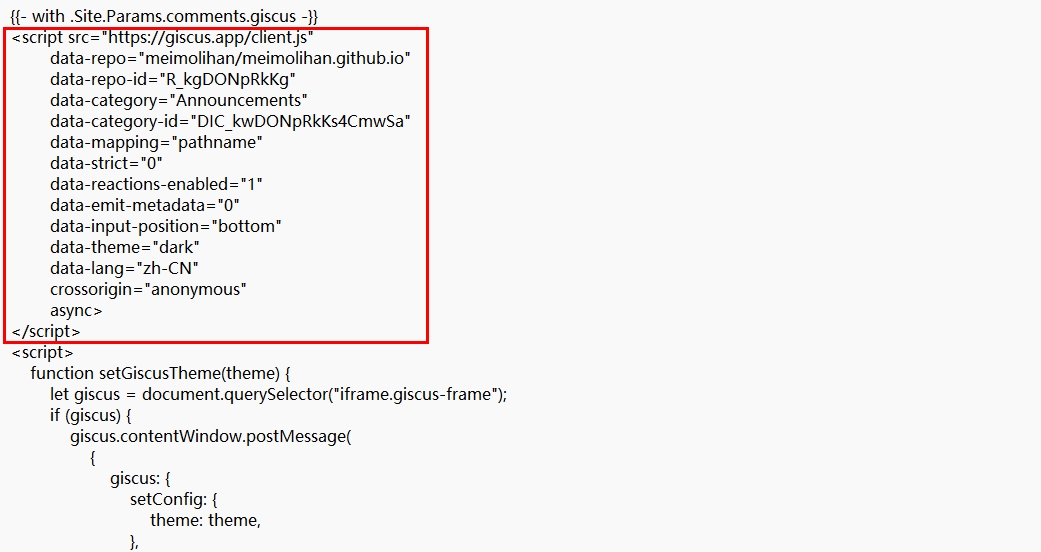
- 随着官网的说明一步步配置下去。配置完成后便可在 启用 giscus 下找到需要的代码:
1
2
3
4
5
6
7
8
9
10
11
12
13
14
15
| <script src="https://giscus.app/client.js"
data-repo="meimolihan/meimolihan.github.io"
data-repo-id="R_kgDONpRkKg"
data-category="Announcements"
data-category-id="DIC_kwDONpRkKs4CmwSa"
data-mapping="pathname"
data-strict="0"
data-reactions-enabled="1"
data-emit-metadata="0"
data-input-position="bottom"
data-theme="dark"
data-lang="zh-CN"
crossorigin="anonymous"
async>
</script>
|
4、修改 hugo 主配置文件
- ✨ 功能:在Hugo配置中启用giscus评论系统
- 📌 位置:我使用的是Hugo的stack主题,需要在 config.yaml 中设置
1
2
3
| comments:
enabled: true
provider: giscus
|
5、引入 giscus-js文件
- ✨ 功能:将giscus JavaScript文件引入到主题中
- 📌 步骤:将stack主题
./themes/hugo-theme-stack/layouts/partials/comments/provider/giscus.html文件拷贝至./layouts/partials/comments/provider/目录下 (需新建)
- 然后将giscus-js代码放到下面的位置:
- ✨ 功能:控制每篇文章是否开启评论功能
- 📌 位置:false 关闭评论,true 显示评论。
7、引入 Pjax 后的评论修复
- 修改
layouts/partials/comments/include.html,添加一个元素标识,方便判断文章是否开启了评论
1
2
3
4
| {{ if .Site.Params.comments.enabled }}
...
<div class="comment"></div>
{{ end }}
|
- 创建
layouts/partials/footer/giscusPjax.html ,引入以下代码
1
2
3
4
5
6
7
8
9
10
11
12
13
14
15
16
17
18
19
20
21
22
23
24
25
26
27
28
29
| {{- with .Site.Params.comments.giscus -}}
<div class="js-Pjax">
<script>
(function () {
let comment = document.querySelector(".comment");
if (!comment) {
return
}
let script = document.createElement('script');
script.src = 'https://giscus.app/client.js';
script.crossOrigin = 'anonymous';
script.setAttribute('data-repo',"meimolihan/meimolihan.github.io");
script.setAttribute('data-repo-id',"R_kgDONpRkKg");
script.setAttribute('data-category',"Announcements");
script.setAttribute('data-category-id',"DIC_kwDONpRkKs4CmwSa");
script.setAttribute('data-mapping',"pathname");
script.setAttribute('data-strict', 0 );
script.setAttribute('data-reactions-enabled', 1 );
script.setAttribute('data-emit-metadata', 0 );
script.setAttribute('data-input-position',"top");
script.setAttribute('data-theme',"light");
script.setAttribute('data-lang',"zh-CN");
script.setAttribute('data-loading', 'lazy')
script.async = true;
document.querySelector('.site-footer').before(script)
})(document);
</script>
<div>
{{- end -}}
|
- 在
layouts/partials/footer/custom.html,引入 giscusPjax.html
1
| {{ partial "footer/giscusPjax.html" . }}
|
- 配置完成,
hugo server -D启动hugo,在本地就可以看到效果。
六、🌀 Hugo 预加载动画
1、新增组件
- ✨ 功能:添加页面加载时的预加载动画,提升用户体验
- 📌 位置:小组件放在
layouts/partials/widget/preload.html 文件里,注意,这个文件是自己创建的:
1
2
3
4
5
6
7
8
9
10
11
12
13
14
15
16
17
18
19
20
21
22
23
24
25
26
27
28
29
30
31
32
33
34
35
36
37
38
39
40
41
42
43
44
45
46
47
48
49
50
51
52
53
54
55
56
57
58
59
60
61
62
63
64
65
| {{ if .Site.Params.enablePreloadingAnim }}
<div id="loading-box">
<div class="loading-left-bg"></div>
<div class="loading-right-bg"></div>
<div class="spinner-box">
<div class="configure-border-1">
<div class="configure-core"></div>
</div>
<div class="configure-border-2">
<div class="configure-core"></div>
</div>
<div class="loading-word">加载中...</div>
</div>
</div>
<script>
if (typeof $ !== 'function') {
console.error("jQuery is not loaded. Please ensure jQuery is included in your project.");
}
window.addEventListener("load", function () {
const loadingBox = document.getElementById('loading-box');
if (loadingBox) {
setTimeout(function () {
loadingBox.classList.add("loaded");
console.log("Preloader hidden after all resources are loaded.");
}, 500);
} else {
console.error("Preloader element not found!");
}
});
let loadedResources = 0;
const totalResources = document.images.length + document.styleSheets.length;
function checkResourceLoad() {
loadedResources++;
const progress = Math.round((loadedResources / totalResources) * 100);
const loadingWord = document.querySelector('.loading-word');
if (loadingWord) {
loadingWord.textContent = `加载中... ${progress}%`;
}
if (loadedResources >= totalResources) {
window.dispatchEvent(new Event('load'));
}
}
document.images.forEach(img => {
img.addEventListener('load', checkResourceLoad);
img.addEventListener('error', checkResourceLoad);
});
document.styleSheets.forEach(sheet => {
checkResourceLoad();
});
</script>
{{ end }}
|
2、组件样式
- ✨ 功能:定义预加载动画的样式和动画效果
- 📌 位置:找到
./assets/scss/custom.scss 在文件里面追加 :
1
2
3
4
5
6
7
8
9
10
11
12
13
14
15
16
17
18
19
20
21
22
23
24
25
26
27
28
29
30
31
32
33
34
35
36
37
38
39
40
41
42
43
44
45
46
47
48
49
50
51
52
53
54
55
56
57
58
59
60
61
62
63
64
65
66
67
68
69
70
71
72
73
74
75
76
77
78
79
80
81
82
83
84
85
86
87
88
89
90
91
92
93
94
95
96
97
98
99
100
101
102
103
104
105
106
107
108
109
110
111
112
113
114
| #loading-box .loading-left-bg,
#loading-box .loading-right-bg {
position: fixed;
z-index: 1000;
width: 50%;
height: 100%;
background-color: #b1c0c7;
transition: all 0.5s;
}
#loading-box .loading-right-bg {
right: 0;
}
#loading-box>.spinner-box {
position: fixed;
z-index: 1001;
display: flex;
justify-content: center;
align-items: center;
width: 100%;
height: 100vh;
}
#loading-box .spinner-box .configure-border-1 {
position: absolute;
padding: 3px;
width: 115px;
height: 115px;
background: #ffab91;
animation: configure-clockwise 3s ease-in-out 0s infinite alternate;
}
#loading-box .spinner-box .configure-border-2 {
left: -115px;
padding: 3px;
width: 115px;
height: 115px;
background: rgb(63, 249, 220);
transform: rotate(45deg);
animation: configure-xclockwise 3s ease-in-out 0s infinite alternate;
}
#loading-box .spinner-box .loading-word {
position: absolute;
color: #ffffff;
font-size: 1.8rem;
font-family: 'Zhi Mang Xing', cursive;
}
#loading-box .spinner-box .configure-core {
width: 100%;
height: 100%;
background-color: #37474f;
}
div.loaded div.loading-left-bg {
transform: translate(-100%, 0);
}
div.loaded div.loading-right-bg {
transform: translate(100%, 0);
}
div.loaded div.spinner-box {
display: none !important;
}
@keyframes configure-clockwise {
0% {
transform: rotate(0);
}
25% {
transform: rotate(90deg);
}
50% {
transform: rotate(180deg);
}
75% {
transform: rotate(270deg);
}
100% {
transform: rotate(360deg);
}
}
@keyframes configure-xclockwise {
0% {
transform: rotate(45deg);
}
25% {
transform: rotate(-45deg);
}
50% {
transform: rotate(-135deg);
}
75% {
transform: rotate(-225deg);
}
100% {
transform: rotate(-315deg);
}
}
|
3、配置文件
- ✨ 功能:通过配置文件控制预加载动画的开启与关闭
- 📌 位置:hugo配置文件
params 栏目底下,加上 enablePreloadingAnim: true
1
2
| params:
enablePreloadingAnim: true
|
七、🖼️ Hugo 图片灯箱
- ✨ 功能:使用 Fancybox 实现图片灯箱/放大功能
- 📌 说明:Hugo 自带的图片渲染是没有灯箱效果的,所以我们需要自己添加。灯箱效果就是点击图片后,图片会放大显示。
修改 Hugo 配置文件
- ✨ 功能:在配置中启用图片灯箱功能
- 📌 位置:修改网站根目录下的 config.toml 或者 config.yaml 文件,我的配置文件为 yaml 格式,toml 需要自行调整格式,在 params参数下添加以下内容:
创建 render-image.html 文件
- ✨ 功能:创建图片渲染模板,支持灯箱效果
- 📌 位置:在你的 Hugo 根目录下创建以下路径和文件:
./layouts/_default/_markup/render-image.html
- 编辑
render-image.html 添加以下内容:
1
2
3
4
5
6
7
| {{if .Page.Site.Params.fancybox }}
<div class="post-img-view">
<a data-fancybox="gallery" href="{{ .Destination | safeURL }}">
<img src="{{ .Destination | safeURL }}" alt="{{ .Text }}" {{ with .Title}} title="{{ . }}"{{ end }} />
</a>
</div>
{{ end }}
|
复制 custom.html 文件
- ✨ 功能:引入Fancybox所需的CSS和JavaScript文件
- 📌 位置:从你主题目录
./themes/stack/layouts/partials/footer/custom.html复制到 Hugo在你根目录 layouts/partials/footer/custom.html ,添加以下内容:
1
2
3
4
5
| {{if .Page.Site.Params.fancybox }}
<script src="https://cdn.jsdelivr.net/npm/jquery@3.5.1/dist/jquery.min.js"></script>
<link rel="stylesheet" href="https://cdn.jsdelivr.net/gh/fancyapps/fancybox@3.5.7/dist/jquery.fancybox.min.css" />
<script src="https://cdn.jsdelivr.net/gh/fancyapps/fancybox@3.5.7/dist/jquery.fancybox.min.js"></script>
{{ end }}
|
接下来就可以直接 hugo server -D 看看效果了。
八、✨ 引入动态背景
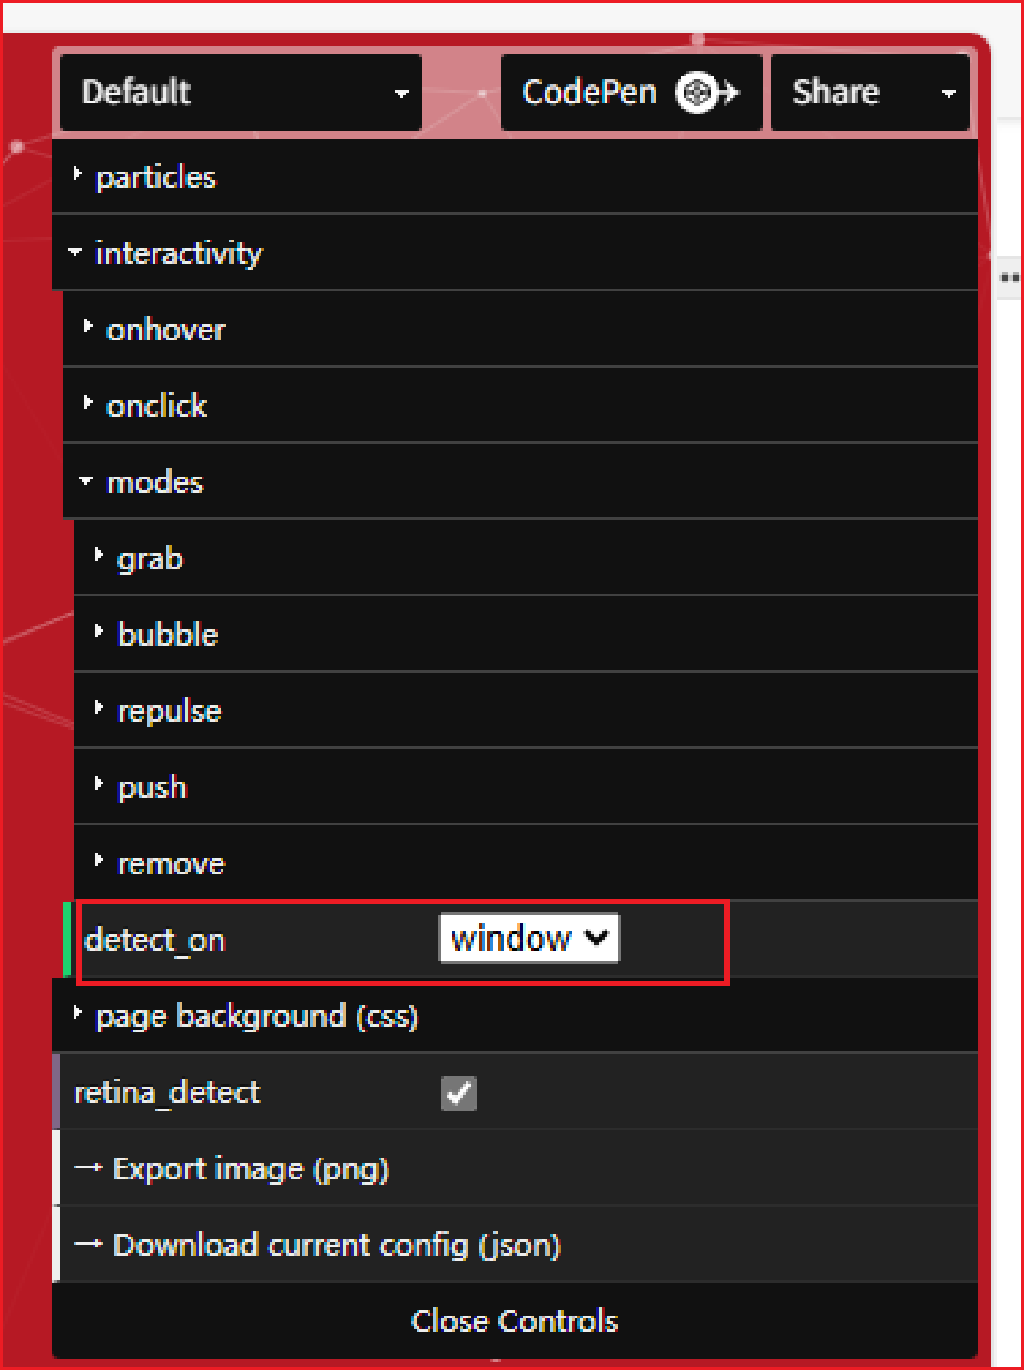
1. 前往【配置页面】配置参数
- ✨ 功能:自定义粒子效果参数
- 📌 步骤:前往【配置页面】配置参数,参数按自己喜好即可,唯一注意要修改的参数是 detect_on,要改成 window
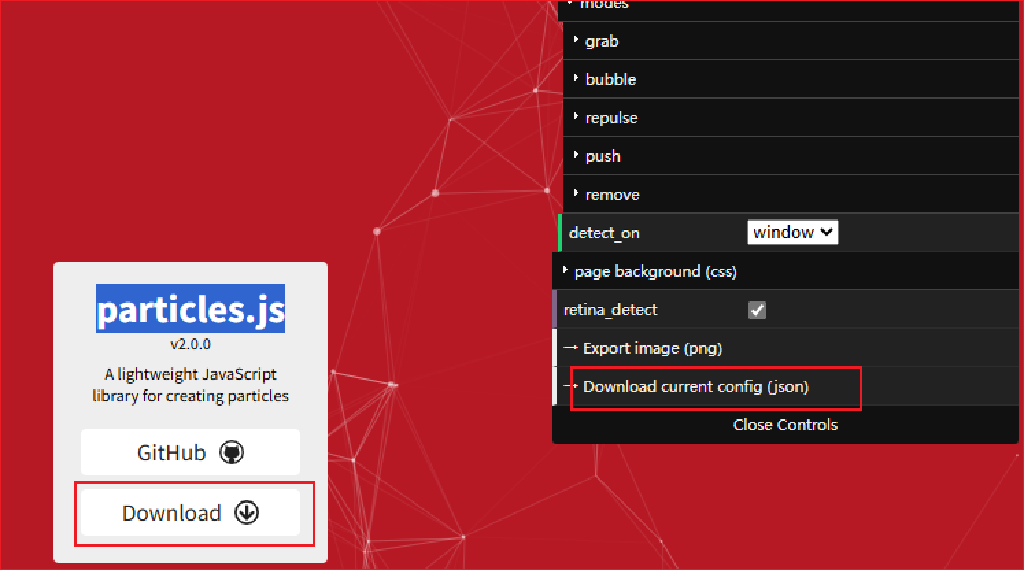
2. 下载配置文件,以及 particles.js 所需要的js文件
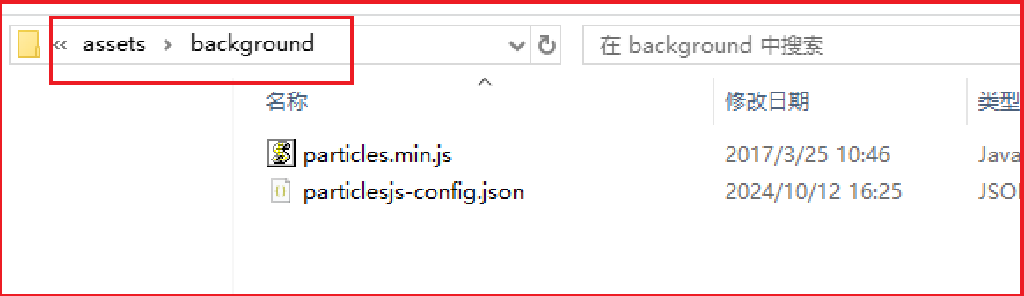
3. 把下载好的文件,解压并将以下两个文件放到assets/background文件夹下
- ✨ 功能:放置粒子效果所需文件
- 📌 文件:
- particlesjs-config.json
- particles.min.js
- ✨ 功能:在页面中引入并初始化粒子效果
- 📌 位置:
1
2
3
4
5
6
7
8
9
10
11
12
13
14
15
16
17
18
| <div id="particles-js"></div>
<script src={{ (resources.Get "background/particles.min.js").Permalink }}></script>
<script>
particlesJS.load('particles-js', {{ (resources.Get "background/particlesjs-config.json").Permalink }}, function() {
console.log('particles.js loaded - callback');
});
</script>
<style>
#particles-js {
position: fixed;
top: 0;
left: 0;
width: 100%;
z-index: -1;
}
</style>
|
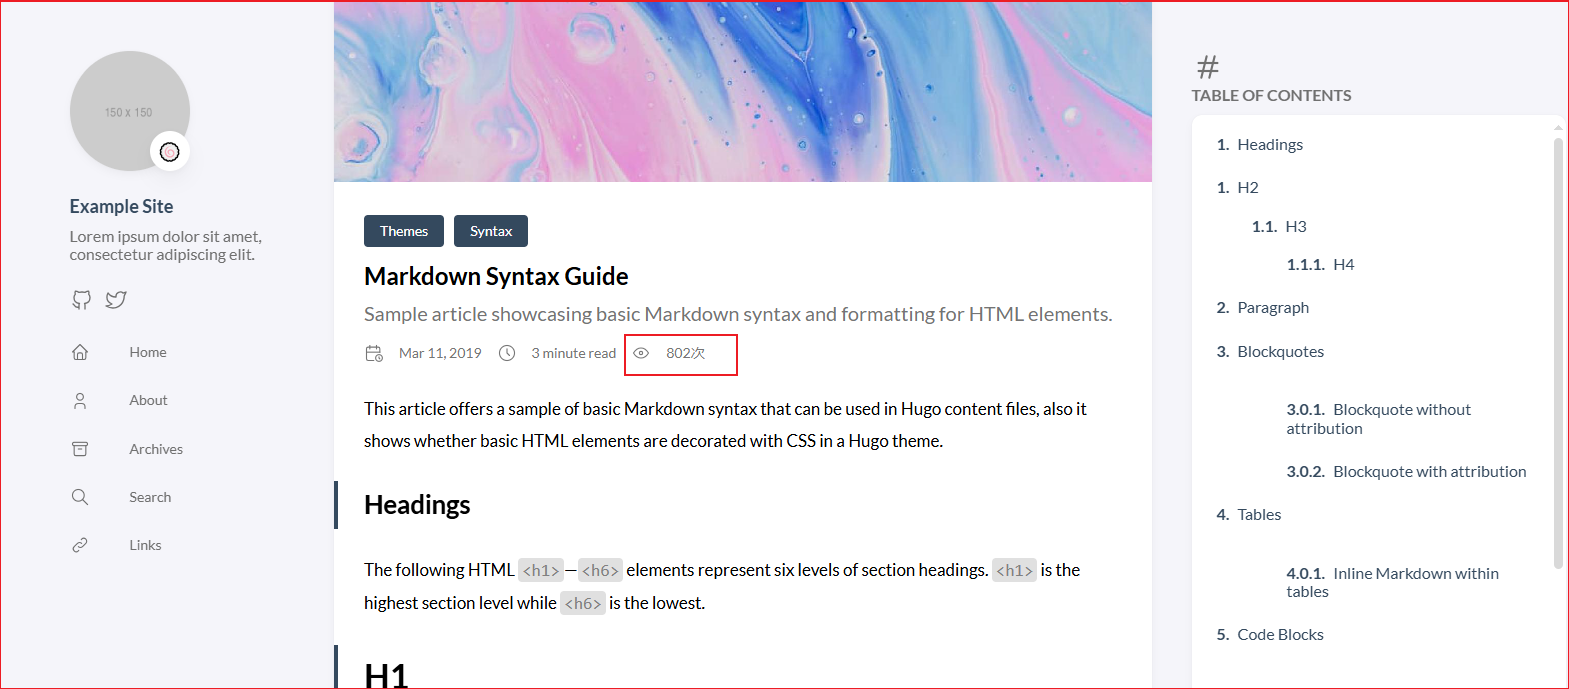
九、📊 博客文章浏览数统计
- ✨ 功能:引入第三方组件,来给博客文章统计浏览数
- 📌 前言:
- 博客文章统计组件个人找到了两个,分别是不蒜子,以及vercount
- 不蒜子比较老,但很稳定,到现在仍然可以使用,没有停服
- vercount则比较新,并做了一些代码优化
- 两种使用都基本一样,差别不大,看自己喜好,下面的教程是以vercount来举例,用不蒜子的话,就把对应的脚本和元素标签替换一下就好
1 基本引入
- (1)修改
layouts/partials/footer/custom.html(不存在则自行创建),引入脚本
1
| <script defer src="https://cn.vercount.one/js"></script>
|
1
2
3
4
5
6
7
8
9
10
11
12
13
14
15
| <div class="article-details">
...
<footer class="article-time">
...
<div id="viewCount">
{{ partial "helper/icon" "eye" }}
<time class="article-time--reading">
<span id="vercount_value_page_pv">loading... </span>次
</time>
</div>
</footer>
...
</div>
|
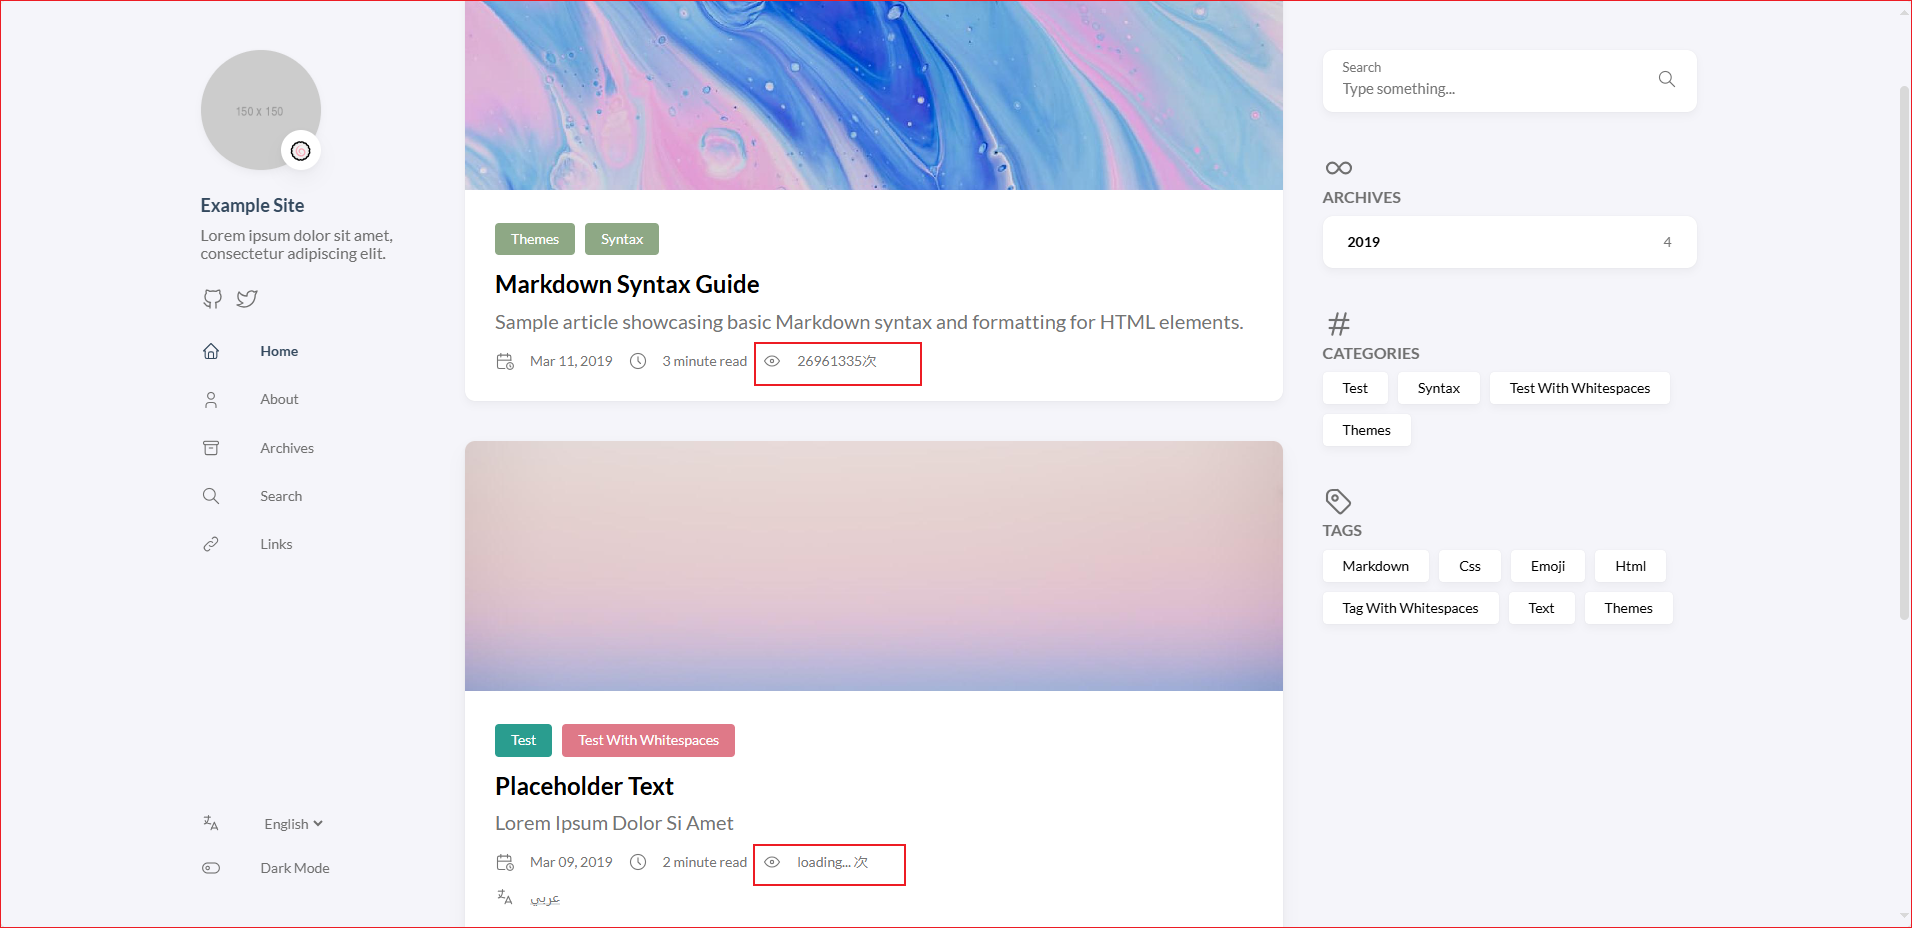
2 问题修复
- 问题描述:
- 博客首页的文章列表显示了浏览数,且只有第一篇文章才有浏览数,并且浏览数的数字不正确
](https://letere-gzj.github.io/hugo-stack/p/hugo/view-count/统计修复1.png)
-
产生原因:
layouts/partials/article/components/details.html此html文件也被用在了博客首页的文章列表,所以也触发了vercount读取当前页面的浏览数- 因为读取的数据是当前页面的浏览数,也就是首页的浏览数,并非文章的浏览数,所以数据只加载一次,且不准确
-
解决思路:
- 由于vercount并未提供
只查询文章浏览数的接口,只有一个文章浏览数+1,并且返回浏览数的接口,所以无法实现首页对每篇文章的浏览数的单独查询
- 既然无法实现首页展示每篇文章的单独浏览数,那就直接隐藏就好了,等点入文章才看到具体的浏览数
-
具体操作:
- (1)修改
layouts/partials/footer/custom.html,引入以下代码
1
2
3
4
5
6
7
8
9
10
11
12
13
14
15
16
17
| <script>
function showHideView() {
let viewCounts = document.querySelectorAll("#viewCount");
if (viewCounts) {
let article = document.querySelector(".article-page");
if (!article) {
viewCounts.forEach(ele => {
ele.style.display = 'none';
});
}
}
}
showHideView();
</script>
|
3、引入 Pjax 后浏览数修复
- 创建
layouts/partials/footer/vercountPjax.html ,引入以下代码
1
2
3
4
5
6
7
8
9
10
11
12
13
14
15
16
17
18
19
20
21
22
23
24
25
| <div class="js-Pjax">
<script>
(function() {
let script = document.createElement('script');
script.defer = true;
script.src = "https://cn.vercount.one/js";
let footer = document.querySelector("footer")
if (footer) {
showHideView()
footer.appendChild(script);
}
})(document)
function showHideView() {
let viewCounts = document.querySelectorAll("#viewCount");
if (viewCounts) {
const style = document.querySelector(".article-page") ? '' : 'none';
viewCounts.forEach(ele => {
ele.style.display = style;
}
)
}
}
</script>
</div>
|
- 在
layouts/partials/footer/custom.html 中引入 vercountPjax.html
1
| {{ partial "footer/vercountPjax.html" . }}
|
- 如果嫌麻烦,浏览数统计可以和更新时间一样,放到文章末尾就好,就不会显示到首页上了
- 具体修改
layouts/partials/article/footer.html就好,看个人喜好吧
十、💃 博客引入看板娘
- 创建
layouts/partials/footer/live2d-v3.html ,引入以下代码
- 修改后的 live2d-v3.html
- 在
layouts/partials/footer/custom.html 中引入 live2d-v3.html
1
| {{ partial "footer/live2d-v3.html" . }}
|
十一、🔤 修改博客字体
1. 下载字体
2. 引入字体
- 创建
layouts/partials/footer/font.html ,引入以下代码
1
2
3
4
5
6
7
8
9
10
11
12
| <style>
@font-face {
font-family: '字体名';
src: url({{ (resources.Get "font/字体文件名").Permalink }}) format('truetype');
}
:root {
--base-font-family: '字体名';
--code-font-family: '字体名';
}
</style>
|
- 在
layouts/partials/footer/custom.html 中引入 font.html
1
| {{ partial "footer/font.html" . }}
|
十二、🐟 博客引入飞鱼页脚
- 创建
layouts/partials/footer/fish.html ,引入以下代码
- 修改后的 fish.html
- 在
layouts/partials/footer/custom.html 中引入 fish.html
1
| {{ partial "footer/fish.html" . }}
|
十三、📋 复制弹窗
- 创建
layouts/partials/footer/copy.html ,引入以下代码
- 修改后的 fish.html
- 在
layouts/partials/footer/custom.html 中引入 copy.html
1
| {{ partial "footer/copy.html" . }}
|


 ](https://letere-gzj.github.io/hugo-stack/p/hugo/view-count/统计修复1.png)